 Tutorial written by
Littl 1 17@aol.com
*Kathy*
1. Open the image you want to work
with...Hold down the Shift Key and
hit the letter "D" *This will create
a duplicate copy of the graphic*
Close out the original graphic...
2. Go to Image, Add Borders, Choose
Symmetric and type in the number of the
size border you want..I chose 12..Then
you can add an Inner Bevel to the border
After Inner Bevel, it should look like this..
Tutorial written by
Littl 1 17@aol.com
*Kathy*
1. Open the image you want to work
with...Hold down the Shift Key and
hit the letter "D" *This will create
a duplicate copy of the graphic*
Close out the original graphic...
2. Go to Image, Add Borders, Choose
Symmetric and type in the number of the
size border you want..I chose 12..Then
you can add an Inner Bevel to the border
After Inner Bevel, it should look like this..
 3. Now resize the picture to about 160X190
pixels...
Then choose a color from your graphic
using the Dropper Tool
3. Now resize the picture to about 160X190
pixels...
Then choose a color from your graphic
using the Dropper Tool  ..Right click using the
Dropper Tool
..Right click using the
Dropper Tool  on the color you wish your
background to be...**Note** Right clicking
places the color to the background and Left
Clicking will place it to your Foreground*
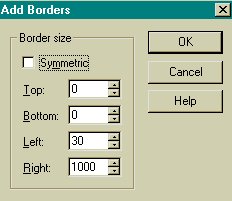
Then go to Image, Add Borders,
and use these settings
*Remember to take the black dot out of
Symmetric*
on the color you wish your
background to be...**Note** Right clicking
places the color to the background and Left
Clicking will place it to your Foreground*
Then go to Image, Add Borders,
and use these settings
*Remember to take the black dot out of
Symmetric*
 Click OK
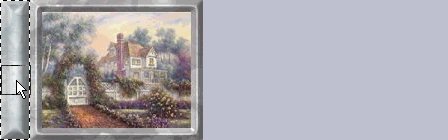
It should now look like this with a space
on the left side..
Click OK
It should now look like this with a space
on the left side..
 4. Use your Magic Wand
  to select the left
side area, then you can add a different color,
a texture, inner bevel or whatever you like.
I took mine to Inner Bevel...
If you are using the Inner Bevel, what I
do to get rid of the separation of the bevel
on the background is I use the Clone Tool
to select the left
side area, then you can add a different color,
a texture, inner bevel or whatever you like.
I took mine to Inner Bevel...
If you are using the Inner Bevel, what I
do to get rid of the separation of the bevel
on the background is I use the Clone Tool  and set the size to the same number as the
side border setting in the Tool Options Box
In this case the Size was '30'.... Now
Right Click on the center of the bevel
to clone that portion of it.. and then place
the Clone Tool on the lower part and
and set the size to the same number as the
side border setting in the Tool Options Box
In this case the Size was '30'.... Now
Right Click on the center of the bevel
to clone that portion of it.. and then place
the Clone Tool on the lower part and
 Left Click to apply it dragging it downward..
Repeat this step on the upper part but
drag the clone tool upwards (**If you have
not used the Clone Tool before, it will take some
practice but this tool can help correct many little
imperfections in PSP...I use it quite a lot..If
you do not use the Clone Tool for this, you will
see a separate bevel line separating the side
border.... This step helps it to appear as one
evenly spread Inner Bevel**)
That's it !!
Real quick !!
This is the finished Bordered Background !
Left Click to apply it dragging it downward..
Repeat this step on the upper part but
drag the clone tool upwards (**If you have
not used the Clone Tool before, it will take some
practice but this tool can help correct many little
imperfections in PSP...I use it quite a lot..If
you do not use the Clone Tool for this, you will
see a separate bevel line separating the side
border.... This step helps it to appear as one
evenly spread Inner Bevel**)
That's it !!
Real quick !!
This is the finished Bordered Background !
 © 2000 *Kath's Tuts & Graphic Designs*